Description
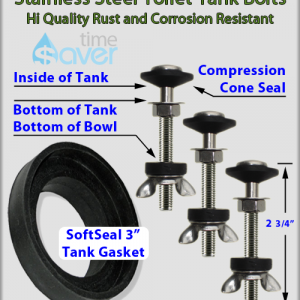
Stainless Steel Toilet Tank Mounting Bolts with No-Leak Cone Washers
- 2 3/4″ x 5/16″ Studs (M70x8) + 3/8″ Nuts + Washers + Wingnuts + 2″ SoftSeal Tank Gasket
- Commercial Grade Stainless Steel and Seals WILL NOT Rust, Corrode or Leak
- Nylon cushion washers Will NOT Chip or Damage Porcelain Tank or Bowl Base
- IMPOSSIBLE TO FIND AT YOUR LOCAL HARDWARE STORE!
Set Includes:
- 3x SAE 304 Stainless Steel Bolt Sets
Remember the last time your toilet tank leaked and you struggled underneath to remove those corroded tank bolts?
Doing the job RIGHT requires quality seals that won’t leak and stainless steel hardware that resists corrosion over time. Our exclusive Cone Seals end tank leaks, while our Stainless Steel Bolts and Wingnuts make installation and removal a breeze.
Tank Bolt and Gasket Installation Tips
Note that each bolt set includes hardware that may or may not be required depending on the toilet tank configuration and installer preferences. The following recommendation is typical for a standard 2 piece toilet tank and makes the mounting process go more smoothly.
Please read over the entire assembly process below to understand the various options before starting the installation . . .
The first step is to simply to get the bolts held in place so that they will not fall out when placing the tank on the bowl. However, the tank can be put into place first and then the bolts dropped through if preferred.
- To hold the bolts in place, stack a flat metal washer followed by a Cone Washer, placing the flat side against the metal washer and the cone pointing downward as shown. Pass the assemblies thorough the holes inside the tank and fasten each with a second flat metal washer and the small 3/8″ nut. Tighten each nut enough such that the Cone Washers just start to bulge under the metal washers inside the tank, usually 1 to 2 turns after finger tightening . . . NO NEED TO OVERTIGHTEN.
- Then place the flush valve gasket (not included) over the flush valve outlet flange, stretching it around the flange and up against the tank until it is smooth and flush. Now carefully place the tank onto the bowl, aligning the tank bolts to pass through their respective holes in the bowl base.
- Once the tank is in place, slip the flat rubber washers on first, followed by the third flat metal washers and then the wingnuts. Finger tighten the wingnuts just enough to snug up the tank, usually one additional turn after they start to feel tight.
- Now turn the water back on to fill the tank and once filled, the extra weight will case it to settle down and further compress seal gasket, likely causing the wingnuts to loosen back up slightly. Check and re-tighten them, adding about one additional turn after they start to feel snug.
Note that Step 1 can be omitted and the 3/8″ nuts used in place of the wingnuts if preferred. The wingnuts are handy for quick no tool re-tightening as required, but the nuts are more tamper resistant in public toilet installations.


Reviews
There are no reviews yet.